So I will be heading up to the cottage this week, and it reminded me of something I haven't posted on yet!
Awhile ago, when I saw this 'Gone Fishing' Cake Topper ' sold through 'Wedding Star' and I thought it was adorable and that it would be cute to have at the wedding as I love to fish and I kind of got Ben 'Hooked' into it as well!
I knew that I didn't want it on the top of my cake though, but then I thought it would be really cute to find an old antique fishing basket, and to place it beside this 'Fishing Cake Topper' and write on a little sign that said: "Cast Your Wish To The Bride and Groom", and then to provide little colourful papers for guests to write their wishes on, and place them in the fishing basket. Then later I can use the 'wishes' in my wedding scrapbook!
So here is the antique fishing basket I found on E-bay. It was only $9.00 and it came from Lakeland Florida (where Jordan is from) so that was neat!
I think this will be a really cute 'Guest Wishes' idea and it really suits our personality!
So these 'body mists' were inspired by an idea from Martha Stewart Living. 'She' had sliced cucumbers and Lavender and placed them in mist bottles with water! I thought it was a very simple but nice idea and that it would be nice to have these at the wedding in the bathrooms for people to use to 'refresh' and cool down with!
And today I was at my friend Carlene's house (a faithful reader od this blog I might add :D), and she happens to have an adorable garden with herbs in the back yard of her adorable little house, and she let me take home a bag of 'Lemon Balm Herbs' that smell delicious! So we decided to stop at the dollar store and pick up some 'mist bottles' for me to test out this idea!
We found two packs the included a 'mist bottle' and a 'cap bottle' so this gave me the idea to also create a 'body oil' by filling the cap bottles with baby oil, as well as the lemon herbs. So when I got home I made them (as I didn't want the leaves of the herbs to wilt) - & I remembered that I had fresh lemon and lime, so I sliced that up as well for extra scent and I placed it, along with cold water and the herbs, into the mist bottles!
I then thought it would be cute to include little clear and yellow glass beads/marbles that I already had to jazz up the 'body oil' bottles, since they did not have lemon and lime slices in them!
Then on Adobe I wrote 'Refresh' for the mist bottles of 'Herbal Lemon Balm and Fresh Lime Body Mist' and 'Relax' for the 'Herbal Lemon Balm Body Oil' - I also found an old fashion depiction of a lemon and thought it would add an extra flare to the bottles! I printed this sheet, making the text the right size to be cut out with my 'tag punch' that I got from 'Stampin Up!'
I purchased yellow ribbon to hold the tags in place so I simply uased a regular whole punch to create a place to hold the tags onto the ribbon, and then I simply tied the ribbon to the bottles and 'Wala'!
I think they turned out really neat and they make a quick and easy gift idea - or would be great as a favour or a prize at a wedding or baby shower. Or it would also be nice to make to place in your own bathroom when you have a BBQ or guests over!
Here are my photos! Like I said, Martha's Got Nothin On Me! :D
I would really love to have old fashioned soda pop for when guests arrive to the reception!
I was in the new Squires restaurant in my home town this weekend and they had 'Boylan Sodas' which are made with pure Sugar Cane and are sooo tasty! They have also been established since 1891, so they look great and go great with the old fashioned theme!!
I have found a 'whole sale' website that sells them in variety packs or in bulk, so its looking like a good option for our refreshment table!!
I would love to place them in my mom's old 'wash tub' with ice!! I found this photo of a wedding that did something similar, and it looks like the kids loved it!
I know a lot of people that like the Boylan brand, so buying a few cases of these to sell at the Jack and Jill might not be a bad idea either! :D
It would also be awesome to get some of these retro 'paper straws' to go with the pop! Only $3.00 for 50!
Yesterday while looking for bridesmaid dresses we also did a bit of 'Antiquing'!!
At an old bookstore I found an adorable old 'Scrap Album' cover for 50 cents!! Its SOO Me with the birds of the front cover, and the green and gold colours!!
I thought it would be great to re-use as a 'guest signing book' for at the reception!
I will simply reinforce the spine to make it strong again and add in scrapbook pages with photos of Ben and I for people to sign around!
We went shopping to loom at bridesmaids dresses, and as I suspected I was not super enthusiastic about many of the choices. To me a lot of them were just too generic, plain, cliche or too expensive for what they were!!
SO after doing so antiquing we decided to stop at 'Fabricland' to look at what material options they had, to see if making skirts (like the ones in the 'inspirational photos' below) was a feasible idea!
And we found some GREAT colour and fabric options! Below are photos of both silk and satin options that we think would look great as skirts and sashes. We would probably use the 4 first shades of the silk for the Bridesmaid's skirts (as they are a nice range of similar tones) and then possibly the burnt orange coloured silk for the Junior Bridesmaids!
Then we would use the satins for sashes to go between the skirt and the girls ivory shirts!!
Aunt Ali has agreed to make the skirts for us, which is totally awesome!! So it looks like this might be a good option to get something a little more unique for the girls to wear!
Silk:
Satin:
Blouse Examples - each girl will either be in the same blouse - or we will pick all different ones that make each girl just a little bit different (like the colours of their skirts)
I found awesome oval frames (which I thought were going to be really hard to find) at Michales Craft Store and they were 40% off! So I got them to frame our Silhouettes in! I thought they would look nice hanging on the doors of the church as people enter! I'm happy with how they turned out - and I can also see them looking nice on the wall of our bedroom or living room in our new home!
I Now Make These For Other Brides - Check them out in my Etsy Shop HERE
How I Made Them:
I simply printed out the silhouettes from my computer onto cream colour card stalk. I then placed them in the frames and attached cream coloured silk ribbon to the back of the frames by tying knots at both ends of the ribbon and placing them under the little brackets that hold the back of the frame on. For those wondering how I made the silhouettes, I did so by taking a picture of each of our profiles (up against a plain wall) and then took the photos into Adobe Photoshop where I selected only our silhouettes and turned them black (warning that it is not as easy as it sounds - but with time and effort they turned out great and it was well worth it!)
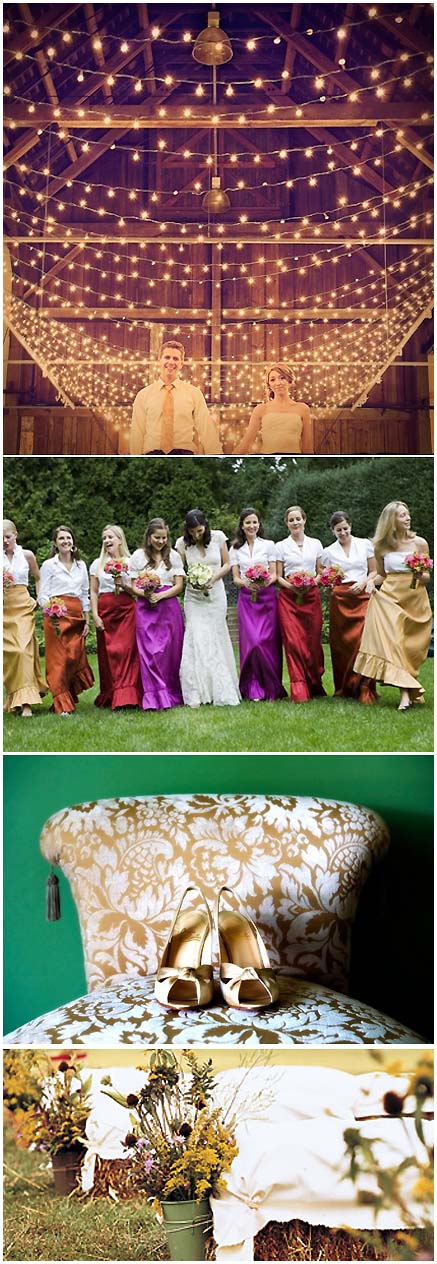
So I found this 'inspiration' wedding randomly on a blog and I LOVE their choice of bridesmaid dresses! They essentially have made matching skirts and chosen their own white/ivory blouses to go with them. I don't love the style of skirt, but I love the idea of being able to have different shades of brown and golden tones, with all unique ivory blouses. Then we could add a thicker sash in the same colour to tie all of the girl's together. It would also cover the seem between skirt and dress! I'm just wanting something more unique then the 'off the rack' dresses that are starting to look the same! But at the same time I would hope that these 'make them yourself' dresses wouldn't end up costing a whole lot more!
I wanted to make little decorated clothespin magnets to hold the mini save the date 'reminder cards' instead of purchasing a generic magnet as I think the home made, crafty magnet goes better with the overall theme of the wedding (We are having a 'clothespin doll' cake topper after all)! Also, now I can customize the colour and look of the magnets to compliment the colours of the wedding!
I was able to get everything to make the clothespin magnets (expect for the spray paint) at the dollar store!
I began by laying out the clothespins on a cardboard box outside, and I purchased utility gloves as I knew that I would have to turn the clothespins in order to coat each side. And I did, I ended up having to wait 3-5mins after spraying each side and then flip them all to the next side (repeating this 3 times).
I used a really pretty colour of spray paint called 'Mocha Latte' I couldn't believe the colour selection they have now!!
I also found these cute little wooden buttons at the dollar store and thought that they might look nice on some of the magnets and so I spray painted them with the copper paint that I had already purchased for the 'tin can hole punch candles' for the reception, so that they would stand out from the mocha colour!
I then found a really nice creamy brown coloured ribbon as well as raffia to tie around the middle of the magnets as well as some brown and cream coloured paper flowers and some sunflowers to attach to the magnets to make them pretty and to make the go with the theme/colour scheme and flowers of the wedding.
I then found three different types of magnets and I think the package in the middle will work best (I found it at the 2nd store) and I had purchased the first and the last package in the first store and didn't know if the roll of self adhesive magnet would be strong enough to hold the clothespin up - but the last type, while strong, only came with six in a pack - so I got both just to try out, BUT then I found the type in the middle and it seems to be stronger than the self adheasive roll and is the perfect width/length to fit right down the magnet, so I'm thinking that will be the best one to use!
I am going to be putting these all together at the end of July when we go up to the cottage as I will have time then to do them all at once, instead of working on them as I have time at home (leaving the house a mess for weeks). Hopefully my mom will be able to help me construct them! They should be easy, but we have to around 65 to make, so it will just get monotonous!
I will post a picture of the final product once they are finished!
Here it is!! Still a bit of a work in progress! But I'm happy with how its turning out! :D I really enjoyed making it and think I would like to 'go into business' making custom things like save the dates, menus, programs, invitations, thank you cards etc. for weddings that all fit the bride's theme and vision perfectly (as often they settle for something that isn't quite what they were looking for). If you or anyone you know is looking send them my way!!
I had an idea today for a fun and unique card box for at the wedding! A Mailbox!! So I looked up some antique mail boxes (and those were way too expensive) and then I looked up regular mailboxes and they are also very expensive (I never would have thought that)!! SO if anyone happens to come across one that they might think would work (even with a little bit of tweaking like a paint job and maybe my dad can even write 'The Rickers' on the side or something cute like that, as he used to be a professional painter!) then please let me know!
Here are a couple of examples of the type of mailbox I thought would look nice! But even if I find a cheap plastic one I might be able to paint it in a metallic finish and put a ribbon around it to make it cute!! Who knows depending on the type of house we get we may even be able to use this 'card box' as our real mailbox!
P.S. Obviously one that doesn't say "U.S. Mail" on the front would be preferred!
Ben and I were working on our Save The Dates Yesterday as we feel that there is no harm in having them out about a year before the wedding as August is a big vacation month and many people tend to make holiday plans a year in advance! So we want to start making them so that they are ready to hand out by the end of this August!
I was searching 'old fashioned calendars' and I came across this one and it became the inspiration for our save the date!
We used the style and layout to get ideas for how to make our Save the Date look like an old fashioned calendar!
We then searched for the perfect font and came across this one and loved it! It looks very old fashioned without looking too circus like or too western!
It took us a long time to construct the calendar by hand, but it looks good and fits our theme (without being too themey) as its simply a calendar!
We also purchased nice embroidered fabric that will be sewn on the back of the card stock! It should look really pretty and rustic!
I have also always wanted to make a magnet to go in our save the dates - so I was simply going to send in a design to a magnet company that I have worked with in the past! But Then I had the idea to make my own (as they will go with the theme better and be cute and more personal) and I had the idea to attach magnets to clothes pins and to then tie a ribbon or some twine like rope in a bow on the clothes pin as well as to spray paint them copper or cream. I would then put a little photo of us with the date on it - or a little card that matches the save the date - in the clothes pin and include that in the envelope with the save the date so that people can put that on their fridge as a reminder!
I just did a google search and found a couple of cute clothes pin magents!
I played around a bit more with our silhouettes and came up with more options!
Let me know if you like the 'busts' better and the hair! And also let me know what you think about the different 'old fashioned' font?! A little less 'formal' and 'classic' than the script writing! May fit our event better?!
I finally took picture of our profiles so that I could attempt to make our silhouettes and I love how they turned out! So I found the little oval frame, took the watermark of it, and used it around our silhouettes! Then I found a nice script font and thought it was the right one as it's a font that we will be able to use on all of our stationary (invitations, program, menu cards, favours etc.) as it's not too busy!
I think this will look great as our logo as it's so custom! It would also look great as the label on our bottles and as the opening page of our slide show!
Let me know if you like the one with the initials better or the one with the full names!
It would also be nice to print each of our slhouettes separately and hang them in oval frames, or in a square frame with an oval matte if we can't find oval frames! We could hand them by ribbon on church doors and then the barn doors as people walk into the ceremony and reception!
I found a Bridesmaids dress I really like! And the company is in Canada which is great! This image is not the right colour (but its the only one I could attach) They have four colours that I like and that I would have to choose from (Cappachino, Latte, Espresso and Butterscotch)! But the lace would be Ivory! I think these dresses would look great with the lace bolero - as they are mostly plain with a lace accent and they are strapless! http://www.dessy.com/dresses/bridesmaid/2717/#catid=1&displaytype=GridMedium&activePage=13&rpp=9&SortOrder=Default If you visit the link you can see how it looks in the different colours listed above!
And the nice this is that they have matching flower girl dresses (with the lace on the waist) and I wanted to be able to get each flower girl in a different shade - so I could have each girl wear one of the differ shades I like!
I also like this one by the same company too - but its not as dressy, and probably a little too much lace!
While I was searching 'invitations' I came across this adorable 'Save the Date Card' and I was shocked to find that the couple posted a link to the PDF of their invitation, as well as to the font they used to create it! So I was able to download their version as well as the font, and simply erase all of their details and make it my own!
I already wanted to do the 'guest seating tree' with a photo hanging on the base of our initials carved in a tree - and I also wanted to theme the cake topper with a wood grain base and with the groom holding a wooden heart with our initials on it! So this Save the Date would work in perfect with our theme! Also because it would be one sided I could sew the fabric on the back of it!
My one concern is that I already had an idea for my Save the Date cards, I have already purchased stamps for it (as I have a 'Stampin' Up' Club that I go to every month) But those Save the Dates were going to be really tricky to make as they involved a spinning wheel of photos on the inside that would show pictures of Ben and I through a hole that was punched on the face of the card, and that was held together by a brad!
So maybe these Save the Dates are easier, and fit the theme really well! And I'm sure I will get a lot of use out of the stamps I purchased any way, even if i don't make those Save the Dates with them.
I love this Western 'Wanted' poster type look for an invitation! It's a little informal for a wedding invitation - but would maybe be neat to use as a 'Jack and Jill' invitation!
I really want to sew our invitation together (as I love the look of sewn paper) - and when I was searching 'sewn invitations' I came across this one, where they have cut out flowers from a fabric that matched the wedding colours and sewn them onto the paper! I really like this idea!
Here is another idea where they have just sewn the fabric on the back of the card, which looks really nice too!
However, I need my invitation to open - as I have a neat Wedding Map that an artist friend of mine is creating! I also want to use our logo on the front of the card - as so far both these examples are one piece invitations (probably the easiest, if not only, way to sew on the fabric!) But these are some great ideas - Maybe I could sew the fabric on the back of my 'Save the Date' as it will be single sided!
I finally put together a collage of our own engagement photos. I am always making them for other couples but never us. I am thinking about getting it custom framed (when frame go half price at Michales) and then doing the same square format of our wedding photos. They will be nice custom pieces for on the wall at home and I like that you can show multiple photos at once (instead of choosing just one!)
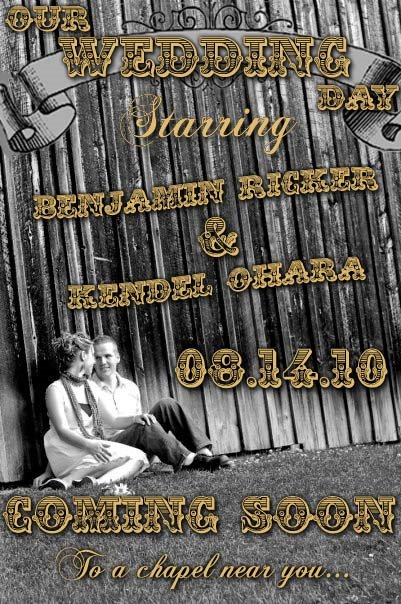
Our Wedding Movie Poster!
My friend Jenn took this photo for us and I thought it would be great to make it into a poster! Great for an online 'Save the Date' or can be used for a 'Jack and Jill' invitation/Poster!
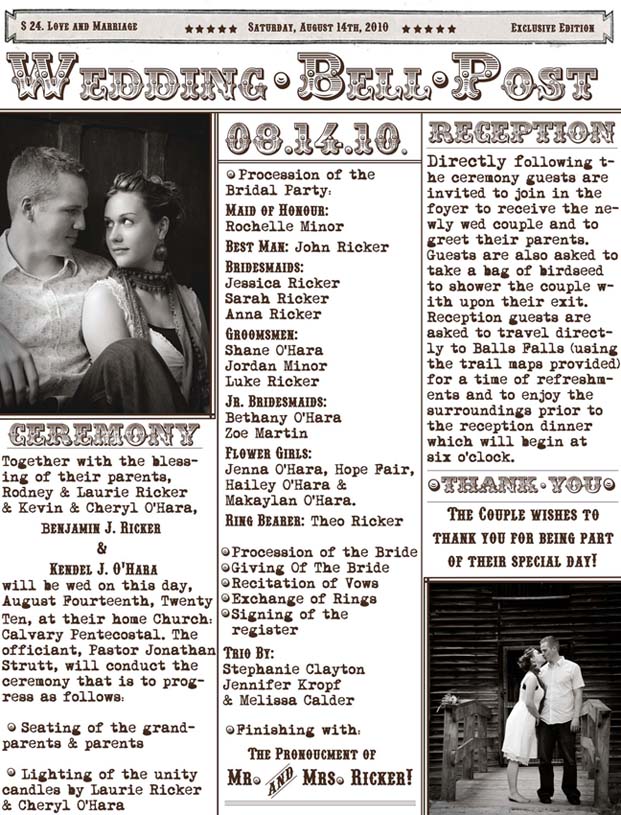
Our Program - News Paper Style
Thanks for visiting our wedding blog! Below you will find posts about our wedding plans! - Photos by Jenn Stark of 'Jennifer Stark Photography' taken at Balls Falls our reception venue!


.jpg)
.jpg)
.jpg)


 I finally took picture of our profiles so that I could attempt to make our silhouettes and I love how they turned out! So I found the little oval frame, took the watermark of it, and used it around our silhouettes! Then I found a nice script font and thought it was the right one as it's a font that we will be able to use on all of our stationary (invitations, program, menu cards, favours etc.) as it's not too busy!